Pages

Grey Water Drain Line Protectors

(NOTE: click on the images for a larger view.)

About half-way between St. Louis and Seattle, I was walking around our 1988 Blue Bird Wanderlodge FC35SB at a rest stop and noticed a little trail of smelly, green fluid coming out from underneath the coach; it was on the curbside from just under the sewer drain. After a quick look underneath I determined it was coming from the grey water drain line, toward the middle of the line. A few days after I got home, I set the coach on some jack stands so I wouldn't get squished and tried to figure out what was causing the problem. The leak turned out to be caused by the clamps holding the pipe. I ended up cutting out the entire length of black PVC pipe and replacing it, but I also added some protection so that the leak wouldn't happen again.

This is a roadside view of the basement container that contains the battery charger. In the bottom right corner of the picture, you can see the location of the drain for both the black and grey tanks. The grey water tank is on the curbside of the coach, so there is a piece of black PVC pipe that leads from the other side of the coach to the drain opening (circled in the picture above).

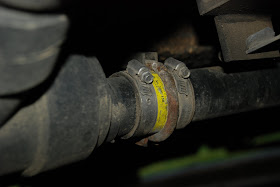
The grey water drain pipe is held underneath the coach with clamps just like the one shown above. They are actually exhaust pipe clamps. Notice the double edge of the clamp that is on the side opposite of the u-bolt. These edges are ultimately what caused the leak. Apparently, the clamps were loose enough that the movement of the pipe rubbed two grooves in it that eventually turned into elongated holes.

This is an example of what I used to protect the pipe. These are ProFlex couplings...I got them at a local hardware store. I used these because I needed some play in order to manipulate the pipe into place, but, more importantly, because they have a stainless steel sheath around them.

This is the roadside end of the drain pipe. I ended up gluing the curbside end of the pipe and then using a flexible coupling to attach the roadside end. As you can see, the sheath is what now protects the line from the clamp.

This is a view of the forward side of the area where the nut originally rubbed on the pipe. I took the rubber connector out and just used the stainless steel sheath. Even though the pipe is securely clamped, there must still be some flex, as you can see where the nut has rubbed off some of the label.

Here is the aft view of the sheath in the area where the nut rubbed the pipe. So far nothing has leaked. The original pipe held out againt the nut and the clamps for two decades, so I expect that the stainless steel sheath should give me at least another 50 years!

Ramco Mirror Controls

(NOTE: click on the images for a larger view.)

The previous owner of our 1983 Blue Bird Wanderlodge FC33SB, installed new Ramco heated, powered mirrors on the coach and then painted them the same color as the body. This really improved the look of the coach and made it nice to be able to adjust the mirrors without getting out in the rain. However, he never decided where he wanted to place the controls for the mirrors, so he hung them from the steering column with some wire ties.

Here you can see where the controls were. They were useable, but they were sideways and knocked into the driver's left knee getting in and out of the seat and during travel. This started to bug me, so I planned to move them over to the other side of the dash, next to the parking brake button.

The biggest thing I was worried about when I was marking the area where the hole in the dash was going to be was the nest of wires behind the dash. I certainly didn't want to cause more work than I had already commited myself to. What I ended up doing was to put in a sacrifical board that would reach from the floor most of the way up to the bottom of the horizontal portion of the dash, which held the wires out of the way of any spinning bits.

First I cut the vinyl and then used my RotoZip tool to cut the wood. When I cut the vinyl, I found that the steel bracket for the parking brake button was encroaching on the space in which I needed to cut the hole, so I drilled a bunch of small holes in the metal, worked the piece out with some Vise Grips and then smoothed the edges with a file.

This is what the controls look like in their new home. I ended up rerouting the wires for the controls (and eventually tieing them up under the dash as well, unlike in this view).This makes it so much easier to adjust the mirrors. In the original position on the steering column, left was up and top was right and bottom was left and right was down...too confusing for my brain while driving. Now it's like we have new mirrors!